

Deploying a personal blog on GitHub Pages has been up and running for some time now, and I have been using the default domain username.github.io. Recently, I finally purchased a 10-year domain on Tencent Cloud for less than 10 pounds. After searching online for articles about custom domains on GitHub, I found the process to be quite simple and can be completed in just a few steps.
First, Register a Domain #
There are many domain registrars available online, such as GoDaddy and Namecheap. Many cloud service providers and CDN providers also offer this service, including AWS, GCP, Tencent Cloud, and Cloudflare. This article will provide a detailed explanation based on Tencent Cloud.
-
Real-name Verification
Log in to
https://cloud.tencent.com/, go toConsole - Domain Registration - Information Template - New Template, and submit it. The review will be completed in about 10 minutes. -
Domain Registration Purchase
In the
Console - Domain Registration - Overview, enter your desired domain for inquiry, or select a recommended domain and purchase it according to the prompts. After completing this step, you can checkConsole - Domain Registration - My Domainsto see the domain record.
Next, Add a CNAME File in the Repository #
You can choose either of the following operations to bind your domain:
-
Option 1: Directly add a
CNAMEfile and enter the domain you want to bind. The file should contain only the main domain you want to bind, without includinghttp://andwww.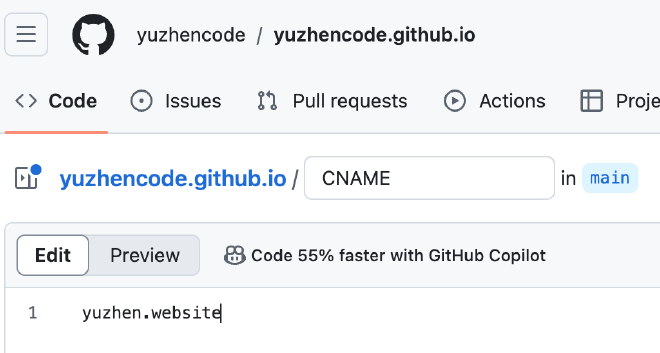
-
Option 2: Click on your blog repository, go to Settings, find
Custom domain, and add your domain before saving it.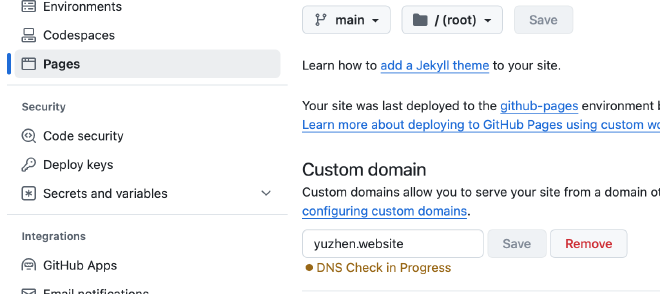
Finally, Add A Records to Point to GitHub Blog IP Address #
Open the terminal and use ping on your GitHub blog address username.github.io to obtain an IP address.

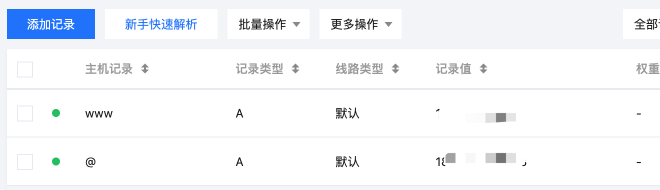
In My Domains - DNS Settings, add two A records. The record values should be the IP address obtained from the previous step. Set one host record as “www” and the other as “@”. This way, you can access your blog via both yourblog.com and www.yourblog.com. Please wait for the DNS configuration to take effect, which typically completes within 10 minutes.
Additional Tips #
- HTTPS Configuration: Once the domain is successfully bound, remember to enable HTTPS in the GitHub Pages settings to ensure the security of your site.
- Regularly Check DNS Records: If you find that your site is inaccessible, you can check the DNS settings to ensure there are no errors.
- Blog Content Management: Regularly update your blog content to stay active and increase visitor return rates.
By following these steps, you can successfully bind your domain to GitHub Pages, enhancing the professionalism and accessibility of your personal blog. If you have any further questions or need additional assistance, feel free to contact me!